
How to Install Crown Moldings

Tools
Miter saw or miter box and handsaw
Caulking gun
6-inch and 11/2-inch putty knives
Rasp or sanding block
Hammer
Sponge
Angled sash paint brush

Materials
Drywall compound or Alex Flex caulking, one gallon will cover about 60 feet of moulding
Finishing nails
150-grit sandpaper
Good quality flat paint
Note: We recommend having 10-15 percent additional material to cover off-cuts and wastage.
1
Measuring
Take a precise measurement of the wall section, starting from the inner corner of the room.


2.a
Cutting straight pieces
Either an electric miter saw fitted with a 12” carbide blade or a hand saw with a miter box can be used for cutting.
- Using a pencil, measure and mark where the moulding is to be cut.
- Place the moulding into the miter box or on the miter saw.
- Move the moulding into position where the pencil marking lines up with the edge of the saw blade.
- Press the moulding firmly against the bottom and vertical side fence, making sure there is no movement, and make a cut.
- Use sandpaper or a sand block to clean up the edges.
2.b
Cutting corner pieces
Use the same process as above, but place two 45-degree cut pieces against the corner wall, forming a 90-degree cornice corner. Note that since most wall corners are not exactly 90-degrees, you will probably notice a gap between the mitered pieces. Fortunately, there’s an easy fix: use a sand block or sandpaper to shave the mouldings as needed for them to tightly fit together, forming a perfect corner.

3
Installation
We recommend using one of two installation options: drywall compound or "Alex Flex Moulding and Trim Sealant."
Note that since most walls and ceilings are not plumb and leveled, the best way to level mouldings is to place them parallel to the horizontal trim of the door or window.
Using a putty knife, apply drywall compound (use a caulking gun for Alex Flex caulking) along the full length of the moulding’s back edges and mitered corner ends.


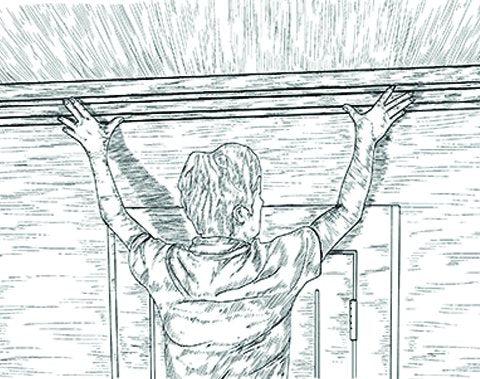
4
Installing Moulding
Put mouldings in place and squeeze out any excess adhesive. Same goes for the inside and outside corners, and straight pieces’ butt joints. Make sure the profiles line up perfectly.


5
Seal The Joints And Gaps
Remove excess material and fill gaps using a putty knife, sponge, or even your finger. Clean up joints and wall gaps.
Use support nails, if needed.
Once dried, remove the support nails, fix any imperfections, and fill nail holes with Alex Flex caulking or drywall compound.


6
Lightly Sand The Joints
Lightly sand joints and nail holes with 150 grit sandpaper.

7
Paint
Apply two coats of flat good quality paint. Primer is not required.

